You’ve found the RV you want. The price is right. The photos look clean. You’re excited. Then doubt creeps in: What if there’s hidden water damage? What if the engine is failing? That anxiety isn’t paranoia—it’s wisdom. Most first-time RV buyers skip the inspection and regret it deeply. One owner discovered $8,000 in water damage after purchase. Another found the transmission failing within three months. Both problems were avoidable with a thorough pre-purchase inspection.
Water damage doesn’t announce itself. A small roof crack looks harmless until rain pours into walls and rots the structure. Electrical problems hide behind panels. Plumbing leaks accumulate in hidden corners. By the time you notice something wrong, the damage has often spread significantly. This guide teaches you exactly what to inspect, what those findings mean, and how to negotiate based on what you discover. Spend three hours doing this right now, and you’ll save yourself thousands in repairs later.
Why Inspection Changes Everything
The financial reality is stark. A $30,000 RV with $5,000 in hidden damage costs you $35,000 total. More critically, that initial $5,000 problem often snowballs. Water damage spreads through walls over months. Electrical issues cause cascading failures. Transmission problems worsen with each use. A $5,000 problem in month one becomes a $15,000 problem by month twelve if left unchecked.
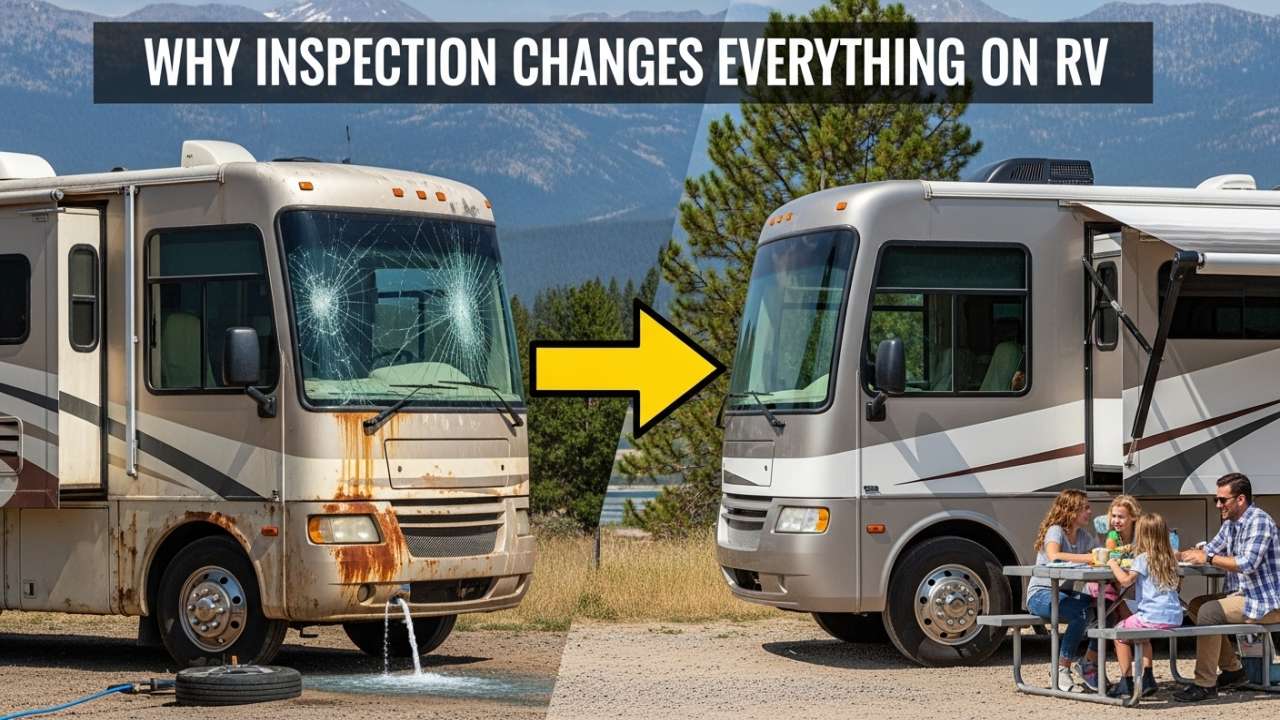
Consider what happens to buyers who skip inspection. RV inspectors find major issues in 70% of used units—not because RVs are defective, but because most buyers never look carefully. One buyer ignored soft spots on the ceiling, only to discover mold had invaded the entire roof structure a year later. Repair cost: $8,000–12,000 and weeks without the RV. Another buyer didn’t test the electrical system, then discovered that after the first trip, lights flickered, the refrigerator stopped cooling, and the AC failed randomly. The problem was a corroded ground wire buried in the wall. Diagnosis took 20 hours and the repair cost $2,500–4,000. These disasters were completely preventable through inspection.
Also Read:- 10 Best Budget RVs Under $50K for Beginners (2026 Guide + Buying Tips)
The Seven-Step Inspection Framework
Rather than overwhelming you with a hundred-point checklist, this framework covers the essential systems and issues that actually matter. Master these seven steps and you’ll catch 99% of deal-breakers before signing anything.
Step 1: Verify Paperwork and Documentation
Before touching the RV, sit with the seller and review documents. Paperwork tells the RV’s story. A clean title means no salvage claim. Service records indicate maintenance commitment. Missing documentation signals neglect.
Verify the Vehicle Identification Number appears on the title, the RV frame (usually stamped), and the door jamb. All three must match exactly. Check whether the title is clean or shows a salvage or rebuilt status. A salvage title means the RV was in a major accident or totaled by insurance—generally a reason to walk away immediately. Ask directly: “Are there any liens on this RV?” The title should clearly show no liens. If one exists, the seller must pay it off before you take ownership. Never agree to handle this later.
Request all available service records, including oil changes for motorhomes, generator maintenance logs, roof resealing history, and documentation of major repairs or replacements. A well-maintained RV leaves a paper trail. If the seller cannot produce records, assume worst-case maintenance. Compare what you find. A 2018 RV with oil changes every six months, annual generator service, and roof seals refreshed every three years shows an owner who understood their responsibility. Conversely, an RV with sporadic maintenance and no generator service for years indicates neglect that will cost you money.
Collect the original owner’s manuals for the RV and all appliances. These prove invaluable for troubleshooting and understanding system operation. Ask about warranty status and whether any coverage transfers to you. Some warranties are non-transferable or require re-registration.
Also Read:- Norcold RV Refrigerator Not Cooling on Electric or Gas: Fix It in 30 Minutes
Step 2: Inspect the Roof and Exterior Carefully
Start at the top. Climb safely onto the roof using a ladder and walk the entire surface, pressing gently on different areas. A solid roof should feel uniform and firm everywhere. Soft or squishy spots indicate water damage underneath—this is a serious red flag. Run your finger along all sealant around vents, A/C units, and skylights. Cracked, dried-out, or missing sealant is an invitation for water to enter during rain.
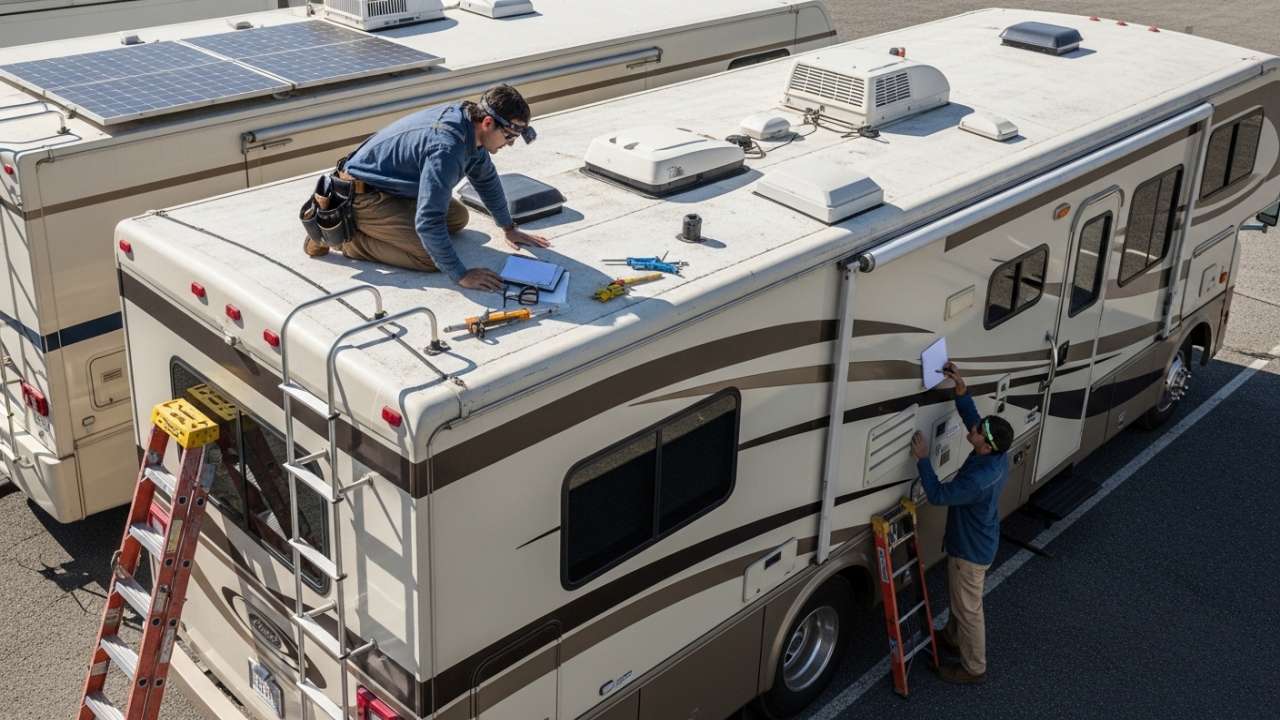
Examine the roof material carefully. Blistering or bubbling indicates delamination—water trapped between the roof layers—which requires structural repair. Look for visible patches or heavy repairs suggesting past water intrusion issues. The metal flashing around vents should be tight and corrosion-free.
Move to the sidewalls and examine for delamination by standing back 20 feet. Look down the length of the RV for bubbles, ripples, or waves in the fiberglass or aluminum. These indicate water trapped between layers. Press gently on suspected areas—solid material should not flex. Check for rust on the aluminum frame and trim; rust indicates water damage or maintenance neglect. Look for water stains showing where water previously entered.
Inspect all storage compartments. Open every external door and examine the seals. Look inside for rust, moisture, or damage. Storage compartments are notorious for water intrusion because seals deteriorate over time. Underneath the RV, bring a flashlight and look carefully for rust, corrosion, or active leaks, especially around slideouts, plumbing connections, and electrical boxes. Check the propane tank and connections for rust or propane smell—either is a dealbreaker. Inspect the hitch on trailers for play or movement; connections should be tight.
Examine tires closely. Find the DOT code on the sidewall and check the year. Tires older than six years are unsafe regardless of appearance—tire manufacturers recommend replacement at this age. Look for cracks, bulges, bald spots, or uneven wear. Press on each tire; it should be firm, not soft. Mismatched tires indicate previous damage. Replacing a full tire set costs $500–2,000, so budget for replacement if tires are aging.
Step 3: Walk Through the Interior Looking for Water Damage
Step inside and walk the entire interior, testing floors systematically. Walk with force and pay special attention to the bathroom, kitchen, and around the entry door—water entry points. Soft or bouncy floors indicate water damage or structural rot requiring expensive repair. Look under furniture and cabinets for water stains—darker patches or rings are clear evidence.
Bring a screwdriver and find an inconspicuous floor spot. Press the tip gently into the material. If it penetrates easily, the subfloor is rotting—solid wood should resist this. Press especially hard around the toilet and shower, which are high-risk moisture areas.
Examine walls and cabinetry throughout. Water damage appears as dark spots, yellowing, or staining on walls and cabinets. Moisture causes wood to warp and swell, making cabinet doors misaligned or difficult to open. Look for peeling wallpaper, which often indicates moisture behind it. Check corners, under cabinets, and in closets for black or green mold spots. Any moldy smell is a dealbreaker demanding you walk away.
In the bathroom, flush the toilet multiple times—water should flow completely and the tank should refill promptly. Run the shower and check the seal around the tub. Press on the floor around the tub for softness. Turn on the sink and let water run for a minute, checking underneath for leaks. Verify proper ventilation exists (a vent fan or window) so moisture can escape.
| Area | Red Flag Warning Sign | Action |
|---|---|---|
| Roof | Soft spots, bubbling, cracks | Consider walking away or negotiate heavily |
| Walls/Cabinets | Dark stains, swollen wood, peeling wallpaper | Request inspection by professional |
| Bathroom floor | Soft or squishy feeling | Major negotiation leverage needed |
| Mold/mildew | Visible growth or strong smell | Do not buy |
Step 4: Test the Plumbing and Water Systems
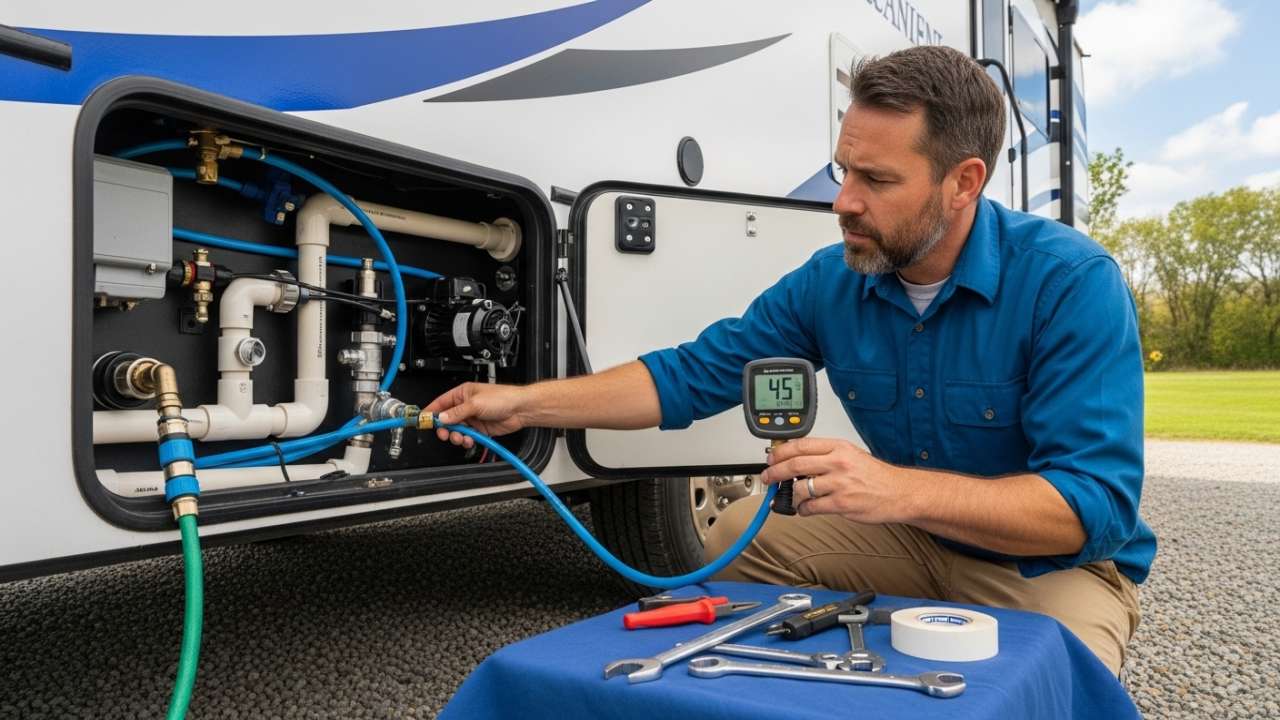
Fill the fresh water tank or connect to an external source and run water for several minutes. Turn on each faucet and look underneath for leaks. Water should flow steadily. Fill the tank completely and check the gauge panel—it should read full. Run water from various fixtures and watch the gauge drop proportionally. Inaccurate gauges make boondocking difficult.
Flush the toilet multiple times and listen carefully for gurgling sounds indicating clogs. Run water through the sink and shower while watching the gray water tank gauge rise proportionally. Any foul odors suggest waste tank leaks, which create smell problems and damage the underbody.
Also Read:- RV Refrigerator Not Cooling? Troubleshooting & Solar Power Fix
Step 5: Check Electrical Systems Thoroughly
Inspect the 12-volt battery first. Look at terminals—are they clean or corroded with crusty white or blue buildup? Ask the battery’s age. RV batteries last three to five years; older ones fail without warning. Turn on interior lights and evaluate brightness. Dim lights suggest a dying battery.
For 110-volt AC power, plug the RV into a proper 30-amp or 50-amp pedestal at an RV park if possible. Use an outlet tester to confirm proper grounding. Locate the breaker panel and check for corroded or loose connections. Test several lights and outlets to confirm they’re powered. Test every interior outlet—they should all work. If the RV has an automatic transfer switch, test it by switching between battery and shore power. Power should transfer smoothly without interruption.
If there’s a generator, listen as it starts. It should fire up cleanly without rough coughing or excessive smoke. Running generators should be quiet—listen for grinding, knocking, or loud noises. Ask when it was last serviced. Generators need annual maintenance; skipped service indicates neglect.
Step 6: Verify All Appliances Function
Turn on the refrigerator and set it to AC mode. Wait 15 minutes, then use a thermometer to check temperature. The fridge should reach 35–40°F. Light each stovetop burner and verify they ignite with even flames. Preheat the oven to 350°F, wait 15 minutes, then place an oven thermometer inside to verify heating accuracy and evenness.
Turn on the furnace and listen as it starts. It should ignite immediately without rough coughing or grinding noise. Place your hand near heating vents—warm air should flow. Test the thermostat to confirm it controls heat properly.
Turn on the air conditioner and listen for unusual sounds. After a few minutes, feel cold air flowing from vents. The interior should cool noticeably. Test every A/C unit if multiple exist.
Turn on the water heater and wait 10 minutes before running hot water at a faucet. You should feel warm or hot water. If it has a propane setting, test that mode too.
Step 7: Test Drive the Motorhome
This applies only to motorhomes. If it’s a travel trailer, skip this step.
Pop the hood and check oil level, coolant level, and belt condition. Look for leaks. Test all exterior lights. Verify tire pressure one more time.
During the drive, pay attention to steering responsiveness and any play in the wheel. Accelerate smoothly and listen for coughing, hesitation, or rough shifts. Test brakes—they should feel responsive and stop smoothly without shuddering. Feel transmission shifts—they should be smooth without slipping or harsh engagement. Listen for engine knocking, pinging, or grinding sounds. Watch for excessive vibration at highway speeds. Monitor the temperature gauge to ensure it stays stable in the normal range. Confirm no red warning lights illuminate.
After parking, let the engine cool. It should drop to normal temperature within five minutes. Look underneath for fresh oil, coolant, or other leaks.
How Inspection Results Affect Price Negotiation
Inspection findings are your negotiation leverage. Use them strategically.
| Issue Type | Repair Cost Range | Price Reduction | When to Walk |
|---|---|---|---|
| Minor cosmetic | $0–500 | –$500–1,000 | Rarely |
| System repairs | $500–2,000 | –$1,000–2,500 | Sometimes |
| Structural damage | $2,000–8,000+ | –$3,000–10,000+ | Often |
| Deal-breakers | $8,000–15,000+ | Walk away | Always |
For every $1,000 in repairs, the RV is worth $1,000–1,500 less. Use this formula when negotiating. Present your findings calmly and in writing. Most sellers know about significant issues and are already factoring them into their expectations.
When to Hire a Professional Inspector
Hire a professional for expensive RVs ($40K+), older models (10+ years), or when you find significant issues. A certified NRVIA inspector charges $200–500 for a 2–4 hour inspection and can save you $5,000–10,000 in unexpected repairs. They’ve seen every problem possible and can identify issues an untrained eye might miss.
Real Inspection Success Stories
The Smart Catch: A buyer found soft spots in the bathroom floor. A professional inspector discovered water damage under the floor extending six feet. Repair cost was $7,500. The asking price was $28,000. By negotiating based on inspection findings, the buyer brought the price down to $22,000. He fixed the floor himself for $3,500 and ended ahead by $2,500.
The Deal-Breaker: Another buyer discovered significant delamination on the walls. An inspector confirmed mold between layers, requiring complete sidewall replacement at $12,000. Walking away was the only smart decision.
Final Thoughts: Time Invested Now Prevents Disaster Later
Buying a used RV requires your time and attention. Spend three hours inspecting properly. Test every system. Ask uncomfortable questions. If something feels wrong, walk away. There will be another RV.
The right RV—well-maintained, no hidden damage, runs smoothly—is worth the search. By being thorough and systematic, you’ll find it. Peace of mind is worth those three hours of work.
By Saket Kumar | Published March 2026
Have you bought a used RV? What did your inspection reveal? Share your experience in the comments—first-time buyers reading this need real stories.