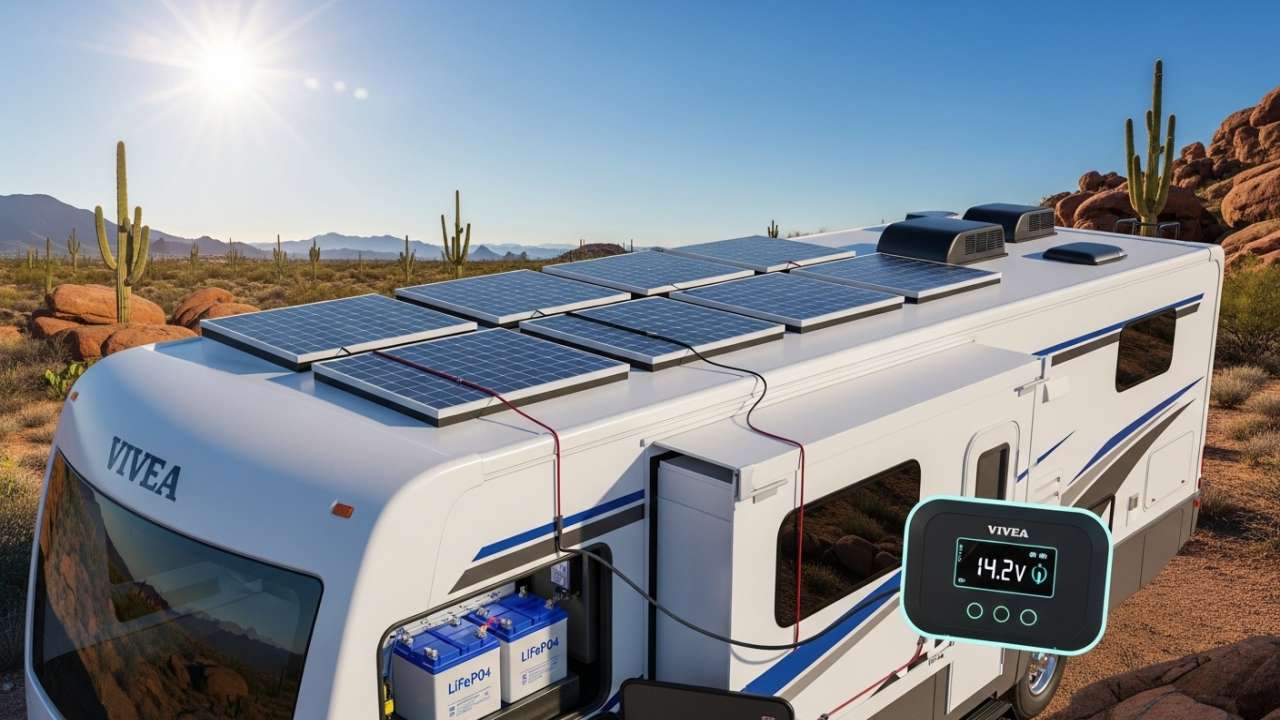
“Want to charge your RV battery with solar and never worry about generator fuel costs again?
This guide covers exactly how: from sizing panels and batteries to wiring everything safely. You’ll learn the 4-step charging setup, real charge times based on your setup, and why most RVers choose lithium batteries (spoiler: they last 10x longer).
Start with the questions below, or jump to the checklist if you’re ready to size your system now.”
That dream is more achievable than most people think. And it all starts with learning how to charge your RV battery with solar the right way.
Whether you’re a weekend warrior or a full-time road tripper, solar charging for RV batteries can save you thousands of dollars — while giving you the kind of freedom that no campsite hookup ever could. This guide covers everything, from picking the best solar charger for RV battery use to setting up a complete RV solar system with batteries that actually work.
What Is Solar Charging for an RV Battery — and Why Does It Matter?
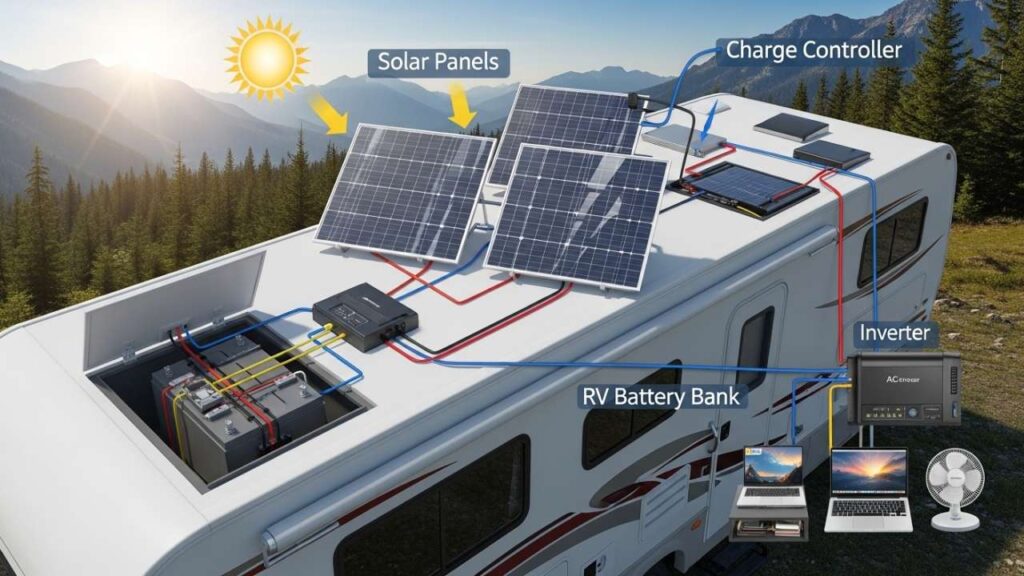
When you solar charge an RV battery, the sun doesn’t power your appliances directly. Here’s how it actually works: solar panels capture sunlight and convert it into DC electricity. That electricity flows through a charge controller, which regulates the power before it reaches your battery bank. Your battery stores that energy — and releases it whenever you flip a switch.
The result? Silent, free, renewable power that lets you camp without hookups for days, or even weeks.
Why More Americans Are Making the Switch
- Generator fuel costs have surged across the U.S. — solar charges your batteries for free after the initial investment.
- The best solar panels for RV battery charging are more affordable than ever before
- Lithium batteries have made complete RV solar systems dramatically more efficient.t
- National Parks and campgrounds are tightening restrictions on generator hou.rs
- True boondocking freedom: go anywhere, stay as long as you want
The 4 Core Components of a Complete RV Solar System with Batteries
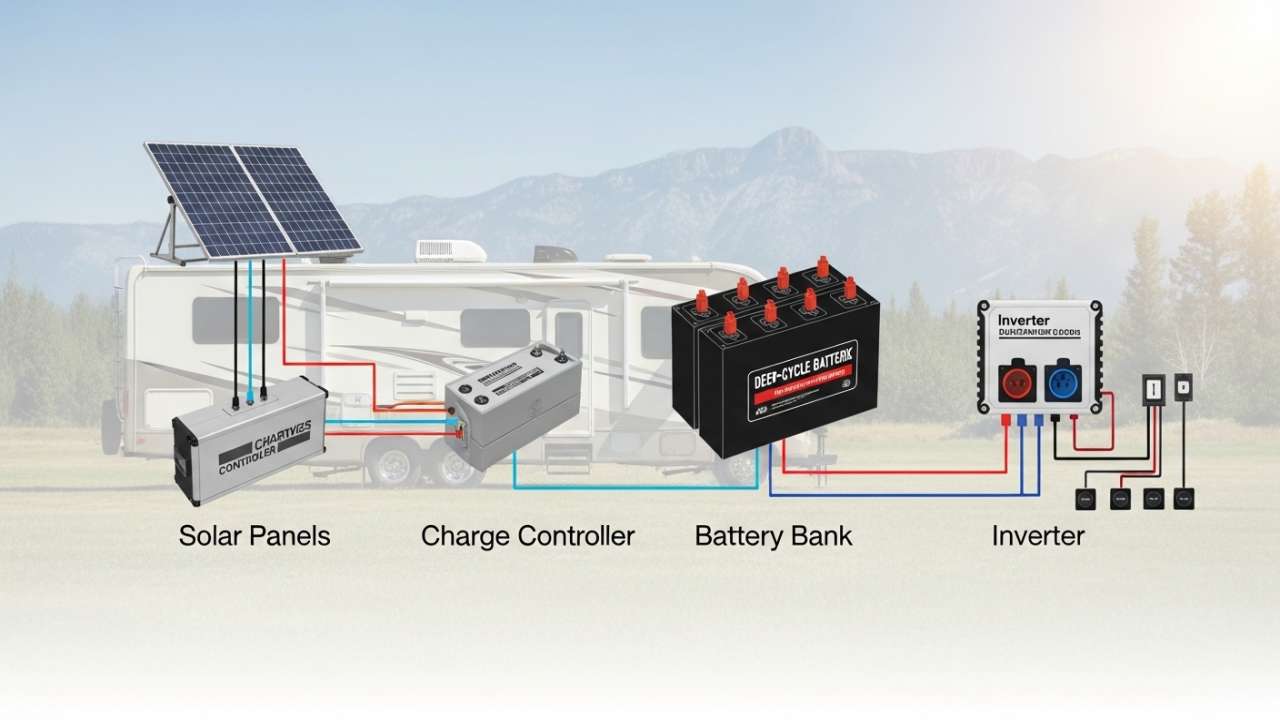
1. Solar Panels
Solar panels sit on your roof or unfold on the ground and capture sunlight. For solar panels for RV battery charging, there are three main types:
- Monocrystalline: Most efficient (18–22%), best for limited roof space, slightly higher price
- Polycrystalline: A bit less efficient, more affordable, and solid in hot climates
- Thin-film/ Flexible: Lightweight and bendable for curved roofs, lower efficiency
For most RVers, monocrystalline panels are the best solar panels for RV battery charging because they produce the most power per square foot. If your roof space is tight, this matters a lot.
Also Read:- Best RV Water Heater for the Money in 2026: Tested Models, Real Talk & the One That Actually Wins
2. Charge Controller
The charge controller sits between your panels and your batteries. It’s the brain of the whole operation — preventing overcharging and regulating the flow of power. Two types:
- PWM (Pulse Width Modulation): Budget-friendly, works fine for smaller systems under 200W
- MPPT (Maximum Power Point Tracking): 20–30% more efficient, best choice for serious setups
If you’re investing in quality solar panels for charging RV batteries, don’t cheap out here. An MPPT controller is worth every penny for systems above 200W.
3. Battery Bank
Your battery is where solar energy lives until you need it. This is the most important decision in your entire RV solar power battery charger setup — and the section below covers it in full detail.
4. Inverter (If You Run AC Appliances)
Solar panels and batteries produce DC power. Most RV appliances run on DC, too. But if you need to run a coffee maker, laptop, or regular AC devices, a 1,000–2,000W pure sine wave inverter converts DC to AC cleanly and safely.
RV Battery Types: Which Works Best for Solar Charging?
| Battery Type | Lifespan (Cycles) | Usable Capacity | Weight | Best For | Approx. Cost |
|---|---|---|---|---|---|
| Flooded Lead-Acid | 300–500 | 50% | Heavy | Budget setups, occasional use | $ |
| AGM | 500–700 | 50–60% | Medium | All-season, maintenance-free | $$ |
| Gel | 500–800 | 60% | Medium | Hot climates, stable discharge | $$ |
| LiFePO4 (Lithium) | 2,000–5,000 | 80–100% | Light | Full-time RVers, off-grid living | $$$$ |
The clear winner for most RV solar setups is Lithium Iron Phosphate (LiFePO4). Yes, the upfront cost is higher. But lithium batteries charge faster, weigh less, last far longer, and let you use nearly 100% of their rated capacity — compared to just 50% for lead-acid.
When you pair lithium with the best RV solar battery charger setup, you’re building a system that will outlast your RV loan.
How Long Does It Take to Charge an RV Battery with a Solar Panel?
This is one of the most searched questions in the RV solar world — and the answer depends on three things: your battery size, your panel wattage, and your daily sun hours.
The Simple Formula
Here’s how to figure out how long to charge your RV battery with a solar panel:
- Find your battery’s watt-hours — Multiply amp-hours by voltage. Example: 100Ah × 12V = 1,200Wh
- Calculate daily solar output — Panel wattage × peak sun hours. Example: 200W × 5 hrs = 1,000 Wh
- Account for system efficiency (~85%) — 1,000Wh × 0.85 = 850Wh usable per day
- Divide battery capacity by daily output — 1,200 ÷ 850 = about 1.4 days from empty to full
| Panel Wattage | Battery Size | Sun Hours/Day | Approx. Charge Time |
|---|---|---|---|
| 100W | 100Ah Lead-Acid | 5 hours | 2–3 days |
| 200W | 100Ah Lead-Acid | 5 hours | 1–1.5 days |
| 200W | 200Ah Lithium | 5 hours | 2–2.5 days |
| 400W | 200Ah Lithium | 5 hours | About 1 day |
| 600W | 300Ah Lithium | 5 hours | 1–1.5 days |
Pro tip: The U.S. National Renewable Energy Laboratory (NREL) offers free solar resource maps showing peak sun hours by location across the country — a genuinely useful tool for planning your system. Check it out at nrel.gov.
Also Read:- RV Water Heater Replacement Cost 2026 — How Much Should You Actually Budget?
How to Charge an RV Battery with a Solar Panel
Ready to set everything up? Here’s exactly how to charge your RV battery with solar from start to finish.
Step 1: Calculate Your Real Power Needs
List every appliance you’ll use and how many hours per day. A realistic example:
- LED lights (50W × 4 hrs) = 200Wh
- RV refrigerator (60W × 24 hrs) = 1,440Wh
- Phone and laptop charging = ~100Wh
- Fan (30W × 8 hrs) = 240Wh
Total daily usage: ~2,000Wh. This tells you exactly how much solar and battery storage you need before buying anything.
Step 2: Size Your Solar Array
Divide your daily watt-hour need by your average peak sun hours. Need 2,000Wh with 5 sun hours per day? You need at least 400W of panels — ideally 500–600W to account for cloudy days and real-world losses.
Step 3: Choose Your Battery Bank
A solid rule of thumb: your battery bank should store 1.5–2× your daily usage. For 2,000Wh of daily use, that means a 200–400Ah lithium bank, or 400–800Ah in lead-acid (since you can only safely use 50% of lead-acid capacity).
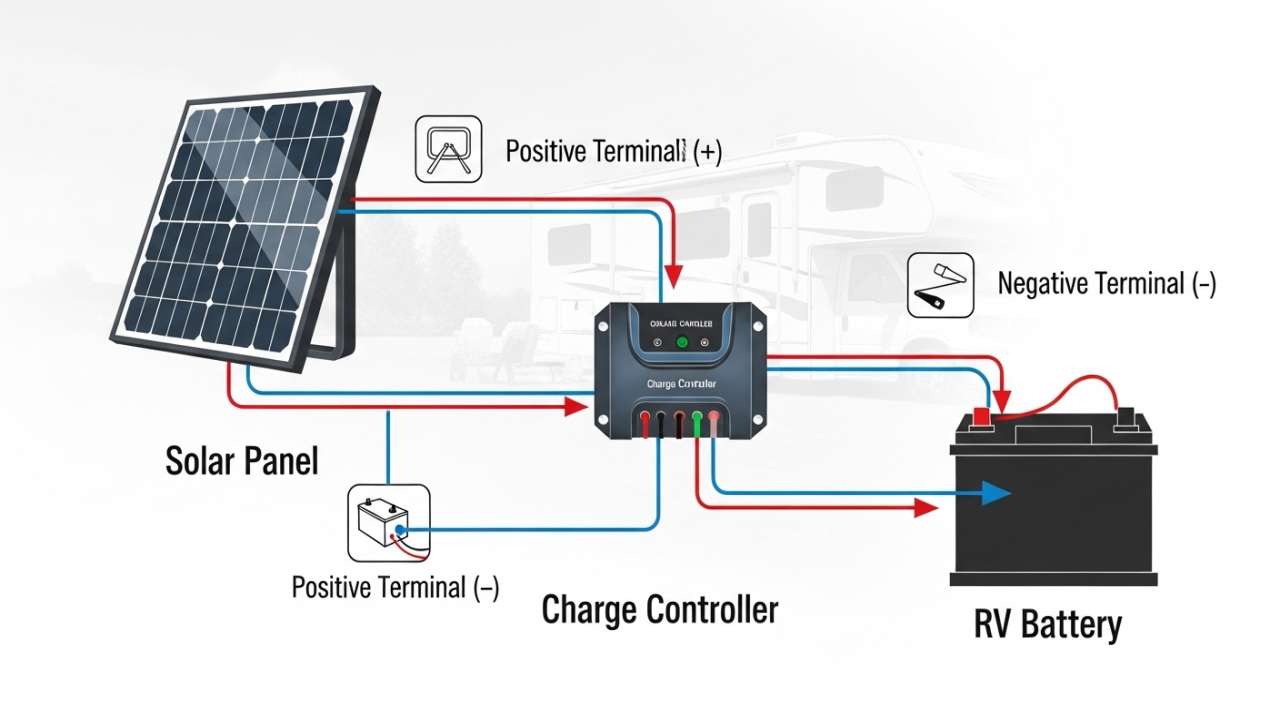
Step 4: Wire Your Charge Controller Correctly
Mount the controller near your battery bank. Always connect in this exact order to avoid damage:
- Connect the charge controller to the batteries first
- Connect solar panels to the charge controller second
Never reverse this. Connecting panels first can damage the controller instantly.
Step 5: Test and Monitor
On a sunny day, check that your controller display shows real incoming wattage. A 200W panel should produce roughly 150–175W in real-world conditions. If numbers seem off, check connections and panel orientation before assuming there’s a hardware problem.
Best Portable Solar Panels for RV Battery Charging
Not everyone wants a permanent roof installation — and honestly, not everyone needs one. The best portable solar panels for RV battery charging give you flexibility to set up anywhere the sun is hitting, not just where your roof faces.
What Makes a Great Portable RV Solar Panel?
- Minimum 100W output (200W+ if you’re running a fridge)
- Built-in adjustable kickstand for optimal sun angle
- MC4 connectors or a compatible adapter for your controller
- IP65 or higher water resistance rating
- Foldable, briefcase-style case for easy storage and transport
- Under 20 lbs with a carry handle
Also Read:- How Much Does It Cost to Add Solar Panels to an RV? (Real Numbers Inside)
Fixed Roof Panels vs. Portable: Which Is Right for You?
Fixed panels win for full-time RVers and people who stay in spots for multiple days. Portable panels win for weekend campers, anyone with a shaded parking spot, or RVers who don’t want to drill into their roof.
Many experienced RVers use both — fixed panels for baseline power and a portable unit for an extra boost on high-demand days. It’s a smart combo that gives you the best of both worlds.
RV Battery Trickle Charger Solar: The Hidden Gem Most RVers Miss
When your RV sits in storage, your battery is quietly draining — even with nothing turned on. A simple RV battery trickle charger solar setup can keep it topped off during those long weeks between trips, extending your battery’s life significantly.
How Solar Trickle Charging Works
A trickle charger sends a small, steady current to your battery — just enough to offset natural self-discharge. For storage use, a 5W–20W solar panel connected to your battery through a small charge controller is usually all it takes.
What to Look for in the Best Solar Trickle Charger for RV Battery
- 5W–20W panel size covers most storage situations
- Built-in overcharge protection so you can set it and forget it
- Alligator clips or SAE connector for easy battery hookup
- Weatherproof housing for outdoor storage exposure
Panels under 5W technically don’t require a charge controller — but adding one is always safer for long-term battery health. Some purpose-built rv solar panel battery charger kits, including options from Furrion, come with everything you need in one box.
Furrion RV Solar Battery Charger: What You Should Know

If your RV came labeled as “solar ready,” there’s a good chance it’s prepped for a Furrion system.
The Furrion rv solar battery charger ecosystem is designed to work with Furrion’s built-in exterior ports found on many Thor, Keystone, Grand Design, and other popular RV brands. The advantage is real: plug-in installation with no roof drilling required for basic setups.
The limitation is also real: Furrion’s proprietary connectors create some lock-in. Adapters are available for third-party panels, but it adds a step. If you have a Furrion port and want a simple plug-and-play experience, sticking with their ecosystem makes sense. If you want maximum flexibility, a universal system gives you more options long-term.
12V Solar Battery Charger for RV: A Common Confusion Explained
Most RV house batteries run at 12V, which is why the 12v solar battery charger for RV is the most common setup out there. But here’s something important that most guides gloss over:
Your solar panels don’t output 12V. A “12V nominal” panel actually outputs 18–22V in full sun. That’s intentional — the charge controller uses that higher voltage headroom to push a full charge into your 12V battery (which needs around 14.4V to reach 100% on lead-acid, or 14.6V for lithium).
This is why some cheap, no-controller setups fail: they can’t deliver enough voltage to truly top off the battery. Always verify your charge controller supports your specific battery chemistry — lead-acid and lithium have different charging profiles, and using the wrong setting can shorten battery life significantly.
Expert Tips for Getting the Most from Your Solar RV Battery Charger Setup
Tilt Your Panels
A panel lying completely flat on your roof generates noticeably less power than one angled toward the sun. Even a 15–20 degree tilt can improve output by 15–25% when parked. If you’re staying in one spot for multiple days, it’s worth the two minutes it takes to adjust.
Also Read:- Best RV Solar Panels for New Mexico: Desert Climate Guide 2026
Wire Gauge Is a Safety Issue, Not Just an
Efficiency One
Undersized wires don’t just reduce charging performance — they overheat and can start fires. Use 10-gauge wire for runs under 10 feet, 8-gauge for 10–20 feet, and 6-gauge for longer runs. When in doubt, go one size heavier. The National Fire Protection Association publishes NEC guidelines for safe solar wiring at nfpa.org.
Add a Battery Monitor
Don’t rely on voltage alone to judge your battery’s state of charge — especially with lithium, which holds a nearly flat voltage curve until it’s nearly empty. A dedicated battery monitor (like the Victron BMV-712) gives you accurate, real-time data on your actual charge percentage.
Shade Is the Silent Killer of Solar Output
A single shaded cell can reduce an entire panel’s output by 50% or more. When parking, prioritize sun exposure for your panels over shade for your windows if solar is your primary power source. In a series-wired array, one shaded panel drags down all the others — something to keep in mind when sizing and wiring your system.
Frequently Asked Questions
Can I charge my RV battery directly with a solar panel without a charge controller?
Technically, yes — but only for panels under 5W. For anything larger, you absolutely need a charge controller. Without one, your battery will eventually overcharge and get permanently damaged. A good controller costs $30–$150. A new battery costs $200–$1,000+. The math isn’t hard.
What size solar panel do I need to charge a 12V RV battery?
It depends on your battery size and how much power you use. As a general starting point, a 100W panel can maintain a 100Ah battery under light usage. For active daily use, plan for 200–400W of solar per 100Ah of battery capacity. The more you use it, the bigger your array needs to be.
How do I know if my RV is solar-ready?
Look for a round, weatherproof port on the exterior — usually labeled “Solar” or branded by Furrion. This port routes wiring directly from the roof to your battery bank. If you have one, a basic solar setup is nearly plug-and-play. If you don’t, you’ll need to run wiring through a roof penetration — a manageable DIY job, but an extra step.
Can I charge my RV battery with solar while driving?
Yes — and it works great. Your roof panels charge your batteries continuously whenever the sun is shining, whether you’re parked or moving down the highway. Many full-time RVers plan drives during peak solar hours specifically so they arrive at their next spot with a full battery bank.
What is the best solar battery charger for an RV?
The best solar battery charger for your RV depends on how much power you use. For a complete system, look for a quality MPPT controller, monocrystalline panels, and a lithium battery bank — brands like Victron, Renogy, and EPever have strong reputations in the U.S. market. For pure maintenance trickle charging during storage, a simple 10–20W panel with a built-in controller is usually more than enough.
How do I prevent my RV battery from overcharging with solar?
Your charge controller handles this automatically — it monitors battery voltage constantly and reduces or cuts off power when the battery reaches full capacity. This is exactly why skipping the charge controller is never a good idea, even for small panel setups.
Does solar charging work on cloudy days?
Yes, but at reduced output — typically 10–25% of rated panel capacity on an overcast day. A well-sized system with adequate battery storage can easily bridge one or two cloudy days. MPPT controllers are noticeably better than PWM at extracting useful power from low-light conditions.
Final Thoughts:
Ask any RVer who’s made the switch — the answer is almost always an enthusiastic yes.
The upfront investment pays for itself in saved generator fuel and campsite fees, often within one or two seasons of regular use. But more than the money, it’s about the experience. There’s something deeply satisfying about knowing the sun is quietly keeping your batteries full while you’re out hiking, kayaking, or just sitting outside with your morning coffee.
Whether you start small with an rv battery trickle charger solar setup to protect a battery in storage, or go all-in with a complete rv solar system with batteries, every step toward solar is a step toward real freedom on the road.
Start with an honest energy audit. Size your system based on actual data, not guesswork. Invest in a quality charge controller and the right battery chemistry for your use case. Do those three things, and your solar setup will reward you for years.