You’re parked at your favorite campground, ready to settle in for the weekend. You flip the switch to extend your RV’s slide-out, and… nothing. Just the sound of a motor straining. Or worse—it’s halfway out and won’t budge.
If you’ve experienced this frustration, you’re not alone. According to RV owners and repair technicians, slide-out failures rank among the top five mechanical headaches in recreational vehicles. The problem? Most people don’t understand how these systems work until something breaks.
The good news? Many slide-out issues can be diagnosed and fixed right at your campsite. Some take just minutes to resolve. Others require professional attention, but knowing what to look for saves you time, money, and a ruined vacation.
This guide walks you through everything—from quick diagnoses to permanent fixes to preventative maintenance that keeps your slides working for years.
Understanding Your RV Slide-Out: What You’re Actually Operating
Before troubleshooting, let’s talk about what’s actually happening when you push that button.
Most modern RVs use one of three slide-out systems. Understanding which one you have matters because the repair approach differs dramatically.
The Three Main Slide-Out Systems
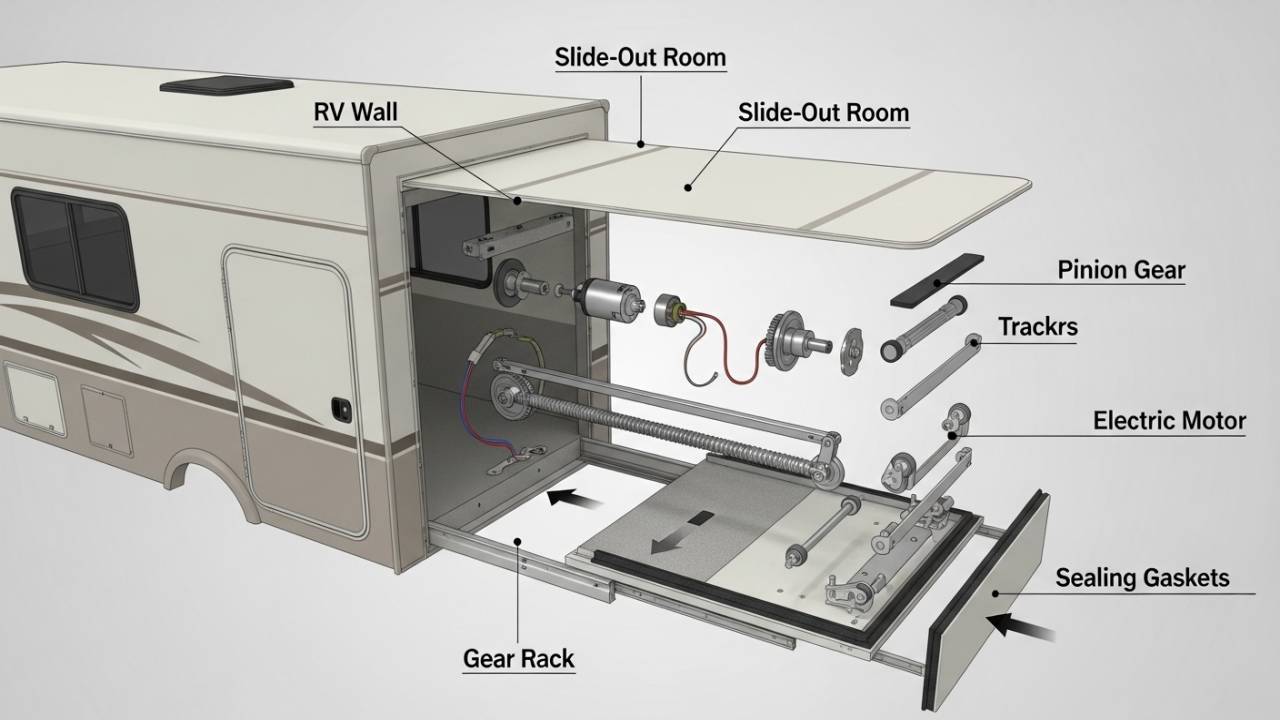
Rack and Pinion (Electric Through-Frame) Slides This is the most common system in today’s RVs. A 12-volt electric motor spins a shaft connected to a pinion gear. That gear moves along a rack (essentially a toothed rail), pushing the entire slide room in and out. Think of it like a hand-powered drill—except motorized and powerful. These systems are relatively simple and mostly reliable, but wear and misalignment cause problems over time.
Cable-Operated Slides (Schwintek or Similar) These use steel cables anchored at all four corners of the slide. The motor winds and unwinds these cables, pulling the slide in and out. You can often spot these systems by looking at the exterior sides of your slide—there are visible cable connections. Cable systems are durable but susceptible to cable fraying, stretching, or coming loose from pulleys.
Hydraulic Slides Less common but found on larger Class A motorhomes, these systems pump hydraulic fluid through valves to push and retract slides. They move smoothly and handle heavy slides well, but hydraulic problems are almost always professional-level repairs.
Quick tip: Check your owner’s manual or look underneath your RV’s extended slide. You’ll quickly identify which system you have.
Also Read:- Why Is My RV Engine Overheating? Solutions & Prevention Tips
Why Your Slide-Out Stopped Working: The Five Main Culprits
Here’s what’s actually broken 95% of the time. Work through these systematically—most require nothing more than a multimeter and a flashlight.
1. Battery Power Failure: The Silent Killer
Your slide-out motor needs at least 11.5 volts to function. Anything lower, and the motor either won’t engage or struggles to move the slide.
How to diagnose:
- Turn on the interior lights. If they’re noticeably dim, your battery is low.
- Use a multimeter to check your house battery voltage. Place the red probe on the positive terminal, black on negative.
- Look for readings between 12.5–12.8 volts (fully charged).
- Anything below 11.5 volts means your motor won’t work properly.
The fix:
- Run your RV’s engine to charge the battery (or generator if you’re boondocking).
- Keep your RV plugged into shore power when operating slide-outs if possible. This prevents excess drain on the house battery.
- Check your battery’s age. RV house batteries typically last 3–5 years. If yours is older, it may hold less charge.
Real talk: I’ve seen countless RV owners panic about a “broken motor” when a $200 battery replacement fixed everything. Start here first.
Also Read:- Rapid City RV Solar: The Complete Black Hills Installation Blueprint for Off-Grid Freedom
2. Blown Fuses or Tripped Breakers: The Quick Win
A blown fuse is the easiest problem to identify and fix—and it happens more often than you’d think.
Your RV’s slide-out system has a dedicated circuit. When too much power draws through (like when a motor is jammed and still trying to push), the fuse blows as a safety mechanism.
How to find and fix it:
- Locate your RV’s main fuse box. It’s usually under the cockpit, near the driver’s seat, or in a basement compartment.
- Consult your owner’s manual for the slide-out fuse location. The label on the inside of the fuse box cover shows what each fuse protects.
- Pull out the suspected fuse and hold it to light. If the wire inside is broken or blackened, it’s blown.
- Replace it with an identical amperage fuse (usually 30 or 50 amp for slide-outs). Don’t guess on this—wrong amperage can cause fires.
- Also look for an auto-reset breaker near the battery. If the switch is in the middle or down position, flip it to on.
If the fuse blows again immediately: This means something is drawing excessive power. This could indicate a jammed motor or internal short. Stop trying to operate the slide and call a technician.
3. Electrical Switch or Wiring Failure: The Tricky One
Sometimes power reaches the motor, but the switch itself is dead or wiring is corroded.
How to test:
- Listen carefully when pressing the extend button. You should hear a distinct click. No click? The switch isn’t engaging.
- Use a multimeter’s continuity setting to test the switch. This checks if electricity flows through it.
- Look for visible corrosion on wiring, especially where cables connect to the battery or fuse box. Corrosion looks like white, blue, or green crusty buildup.
The fix:
- Corrosion often cleans up with some WD-40 and a wire brush. Spray it on, let it sit for 10 minutes, then gently scrub the connections.
- If the switch is bad, most replacement switches cost $150–$300 and can be swapped by handy RV owners.
- If wiring is severely damaged, this is professional territory.
Also Read:- How to Build an RV Solar Battery Bank: Your Complete Guide to Off-Grid Freedom
4. Jammed, Dirty, or Misaligned Tracks: The Most Common Problem

This is the “no power issue” scenario where everything’s electrical is working, but the slide won’t move anyway.
When tracks get caked with dirt, debris, or corroded, the motor can’t overcome the friction. Sometimes the tracks are simply misaligned after a bump or accident.
How to diagnose:
- While someone presses the extend button, get underneath or beside your RV and watch the slide mechanism.
- Does the motor sound like it’s straining? You’ll hear a high-pitched whining or grinding.
- Is there visible debris, leaves, or rust on the tracks?
- Look for bent metal or signs the slide is dragging.
The fix:
- Simple cleaning: Use a wire brush to scrub debris from tracks. Get out rocks, leaves, dirt, and buildup.
- Lubrication: Apply a dry lubricant (NOT WD-40—this attracts dirt) to all moving parts. Products like Tef-Gel or RV-specific slide lubricants work best. Spray generously and cycle the slide in and out several times to distribute the lubricant.
- Deep cleaning: For really grimy slides, use a dry cloth to wipe tracks, then spray with WD-40, wait five minutes, and scrub with a brush. Wipe clean and apply proper slide lubricant afterward.
- Alignment issues: If tracks are clearly bent or the slide is dragging, this requires professional realignment. Continuing to force it will damage the motor and frame.
Pro tip: Do this maintenance twice a year (spring and fall) and you’ll avoid 70% of slide-out problems.
5. Motor Failure, Gearbox Damage, or Broken Cables: The Professional Calls
Sometimes the motor itself burns out, internal gears strip, or (with cable systems) the cables fray or break.
Signs of motor failure:
- You hear absolutely nothing when pressing the button—no click, no hum, just silence after checking power is present.
- The motor hums but doesn’t move the slide. This usually means the gearbox is stripped or a set screw came loose.
- With cable systems, you might see a cable that’s visibly frayed, broken, or hanging loose.
Why this requires a professional:
- Replacing an RV slide-out motor costs $1,500–$3,000 installed.
- Gearbox repairs need specialized tools and expertise.
- Removing a motor often requires cutting access holes through your RV’s underbelly.
If you’re confident in your mechanical abilities and want to tackle it yourself, go for it. Everyone else: call a qualified RV technician. Trying to force a motor that’s truly dead will only cause more damage.
Also Read:- Best Solar RV Panel Kit & Best Caravan Solar Panel Kit Guide 2026
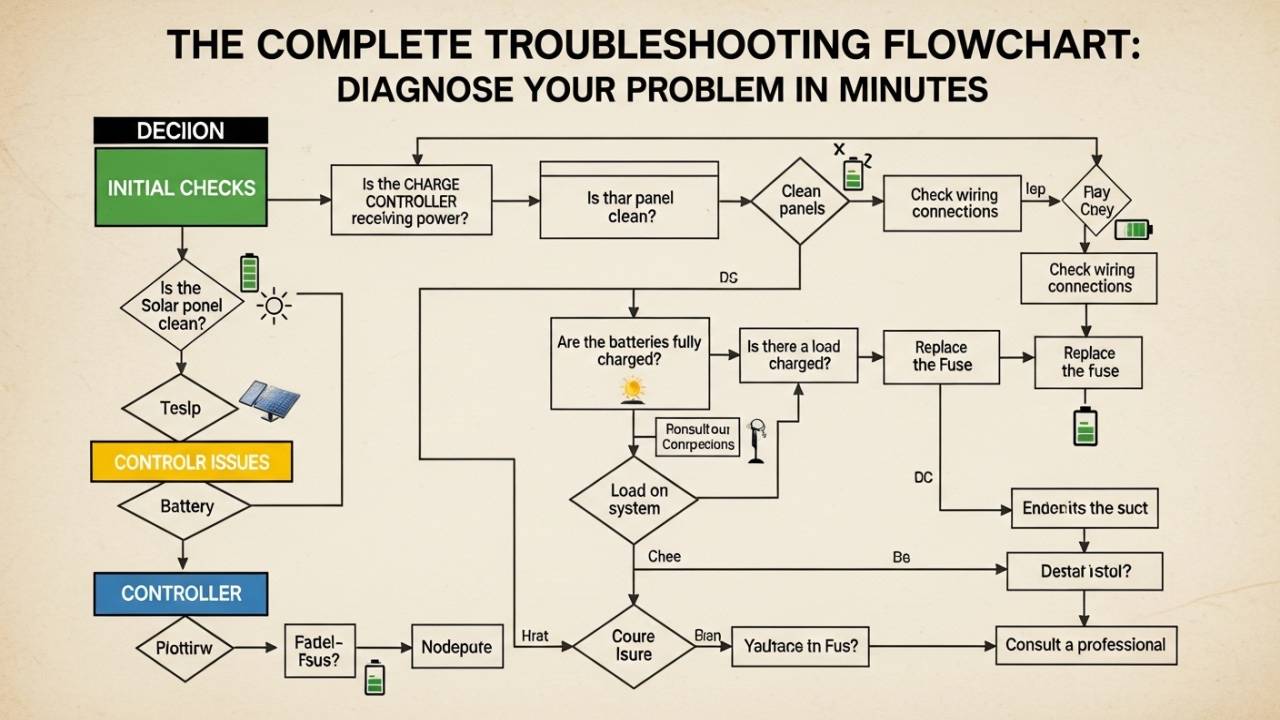
The Complete Troubleshooting Flowchart: Diagnose Your Problem in Minutes
This systematic approach will identify your problem 9 times out of 10.
Step 1: Power Check (2 minutes)
- Does your RV engine/generator run? Yes → Step 2. No → Start engine, go to Step 2.
- Check battery voltage with a multimeter. Above 11.5V? Yes → Step 3. No → Charge battery, try again.
- When you press the button, do you hear any sound at all? Yes → Step 4. No → Step 2 (power isn’t reaching the motor).
Step 2: Electrical System Check (5 minutes)
- Check the slide-out fuse. Blown? Yes → Replace it, try slide again. No → Continue.
- Look for an auto-reset breaker near the battery. Is it switched off? Yes → Turn on. No → Continue.
- Check for corroded connections at battery terminals and fuse box. Yes → Clean with WD-40 and wire brush. No → Continue.
- If still no power, the problem is in the wiring or switch. Call a technician.
Step 3: Switch and Audio Check (3 minutes)
- Press extend. Hear a clicking sound? Yes → Motor is trying to work, go to Step 4. No → Switch may be dead, call a technician or test switch with multimeter.
- With the button held, do you hear continuous humming from the motor? Yes → Motor is working, go to Step 4. No → Motor issue, possibly dead motor.
Step 4: Physical Inspection (10 minutes)
- Have someone hold the button while you watch the slide mechanism underneath the RV.
- Does the motor shaft spin but the slide doesn’t move? Yes → Gearbox or cable issue, likely professional repair needed.
- Does the motor barely move and struggle? Yes → Tracks are dirty or misaligned, proceed to cleaning.
- Can’t see movement due to RV design? → Proceed to cleaning anyway.
Step 5: Clean and Lubricate (15 minutes)
- Retract the slide fully.
- Use a wire brush to remove all visible debris from tracks, especially around the seal.
- Spray dry lubricant on all moving parts. Cycle slide in and out 5–10 times slowly.
- Test the slide. Does it work smoothly? Yes → Problem solved. No → Likely mechanical failure, call a technician.
Also Read:- Top Solar RV Battery Setup for Off-Grid Weekends (2026 Guide): Panel Size, Battery Type & Cost Breakdown
Comparison Table: Common Repair Costs & Difficulty Levels
| Problem | DIY Difficulty | Estimated Cost (DIY) | Estimated Cost (Professional) | Time to Fix |
|---|---|---|---|---|
| Blown fuse | Very easy | $15–$30 | $100–$200 | 5 minutes |
| Battery too low | Easy | $0–$20 | $200 (if battery replacement) | 15 minutes |
| Dirty tracks | Easy | $15–$40 | $300–$600 | 20 minutes |
| Corroded connections | Easy | $10–$20 | $200–$400 | 15 minutes |
| Bad switch | Moderate | $150–$300 | $400–$600 | 1 hour |
| Motor failure | Very hard | $1,500–$3,000 | $1,500–$3,000 | 4–8 hours |
| Gearbox damage | Very hard | $800–$2,000 | $1,200–$2,500 | 4–6 hours |
| Broken cable | Moderate | $200–$600 | $800–$1,500 | 2–3 hours |
| Hydraulic leak | Very hard | $500–$2,000 | $1,000–$3,000 | 3–5 hours |
The Complete Troubleshooting Flowchart: Diagnose Your Problem in Minutes
If your slide is stuck in the extended position and you need to drive somewhere (or just get it closed), there are manual methods.
Important caveat: Manual retraction should only be done as a temporary emergency measure to get to a repair facility. Don’t do this repeatedly—you’ll damage mechanisms designed for smooth motor operation.
For Rack and Pinion Systems (Most Common)
- Find the motor housing. It’s usually mounted underneath the slide, near the frame.
- Locate the manual crank. Your RV came with one—check the utility compartment or under the dinette. It looks like a small wrench or T-shaped handle.
- Disconnect or remove the brake assembly if your system has one (usually a small bracket with bolts).
- Attach the crank to the motor shaft. Look for a hexagonal socket on the motor shaft itself.
- Turn clockwise to retract. You’ll feel resistance. This is normal. Don’t force it violently, but steady pressure works.
- Call for professional help. Once it’s retracted, don’t operate it electrically until a technician inspects it.
Also Read:- Solar RV Panel Kits with Battery and Inverter Systems in 2026
For Cable Systems
Cable systems are harder because the mechanism is distributed around the slide’s perimeter. Your manual has specific instructions for manual operation. Follow them exactly, or risk damaging pulleys and cables.
Preventative Maintenance: Stop Problems Before They Start
This is the real secret to trouble-free RV slide-outs. Most problems are entirely preventable with basic maintenance.
Maintenance Schedule
Every Month (or at least before each trip):
- Visually inspect tracks from outside. Any visible debris, bird nests, or damage?
- Listen to the slide operation. Grinding, squeaking, or unusual sounds?
- Check for water drips or staining around the slide seal (indicator of leaks).
Every 3–4 Months:
- Clean tracks with a brush to remove light debris.
- Apply dry lubricant to all tracks, gears, and seals.
- Wipe down the slide seal with a cloth.
Every 6 Months:
- Deep clean the tracks and mechanism as described in the “Jammed Tracks” section above.
- Inspect hydraulic fluid levels if you have a hydraulic slide.
- Test manual retraction procedure (don’t actually retract, just locate the manual crank and familiarize yourself).
Annually:
- Have a professional perform a comprehensive inspection. They’ll catch wear and alignment issues before they become problems.
- Replace slide seals if they’re cracked, hardened, or peeling.
- Lubricate the motor bearings if accessible.
The Three Rules of Slide-Out Care
- Keep them level. Never extend or retract slides when your RV isn’t level. This puts enormous strain on the mechanism. Most slide-out failures happen when extending on unlevel ground.
- Never drive with them extended. This should be obvious, but it happens. Never, ever drive with a slide extended. The vibration and wind forces damage mechanisms and can cause rollovers.
- Remove weight before operating. If people are sitting on the slide room or there are heavy items, remove them before extending/retracting. The motor isn’t designed for that extra load.
What Professional Repair Actually Involves: Setting Realistic Expectations
If you’ve reached the conclusion that professional help is needed, here’s what to expect.
What to Tell Your Technician
Don’t just say “the slide-out doesn’t work.” Instead:
- “The motor hums but the slide doesn’t move.”
- “There’s a grinding sound and the slide moves very slowly.”
- “The motor doesn’t engage at all even though power is present.”
- “The slide is halfway out and stuck.”
This information helps them diagnose without extensive testing.
What the Diagnosis Usually Involves
A qualified RV technician will:
- Check electrical voltage and switch operation.
- Physically inspect tracks, seals, and the motor.
- Listen to the motor under load.
- Check for fluid leaks (hydraulic systems).
- Measure track alignment.
- Provide a written estimate before starting work.
When to Replace vs. Repair
Repair makes sense if:
- The problem is a bad switch, blown fuse, or corroded connections.
- The slide is only a few years old.
- You’ve owned the RV for a long time and it’s otherwise in good condition.
Replacement makes sense if:
- The motor is completely dead and several years old.
- The gearbox is stripped and the slide is heavy (Class A motorhome).
- The repair cost exceeds 60% of the replacement cost.
- You plan to keep the RV many more years.
Frequently Asked Questions About RV Slide-Outs
Q: Can I leave my slide-out extended while camping?
A: Technically yes, but it’s not ideal. Extended slides increase wind resistance, make your RV less stable if hit by wind, and put continuous strain on seals. Most experienced RV owners retract slides when they leave the campsite or retire for the night, then extend for occasional use.
Q: Why does my slide squeak so loudly?
A: Usually dirt or debris in the tracks, or dried-out lubricant. Clean the tracks and reapply dry lubricant. If it persists, you might have metal-on-metal contact, which indicates wear that needs professional inspection.
Q: Is it safe to travel with a stuck slide?
A: No. A stuck slide in the extended position creates aerodynamic problems and shifts weight distribution. A stuck slide in the retracted position is safer but puts strain on seals. Get it serviced before traveling.
Q: How often should I lubricate my slide-out?
A: Every 3–4 months during normal use, or more frequently if you camp in dusty environments. Some owners lubricate before each trip—it takes five minutes and prevents 80% of issues.
Q: My motor hums but doesn’t move the slide. Is it the motor?
A: Probably not. Humming indicates the motor is running. The problem is usually a jammed mechanism, stuck gears, or broken cables. Try the cleaning procedure first. If it still doesn’t work, it could be internal gearbox damage, which is professional-level.
Q: What’s the difference between a slide being “stuck” vs. “not working”?
A: “Stuck” means it was working, then got jammed (usually mechanical—dirt, debris, misalignment). “Not working” usually means electrical (no power, dead switch). Treatment is completely different.
Q: Can I fix a hydraulic leak myself?
A: Not recommended. Hydraulic systems require special fluid, specific tools, and knowledge of pressure ratings. A leak means internal seal failure, which isn’t a DIY fix. Professional repair is essential.
The Bottom Line: Your Slide-Out Action Plan
If your slide-out isn’t working:
- Check battery voltage first (2 minutes). Low voltage? Charge it.
- Inspect for blown fuses or tripped breakers (3 minutes). Found one? Replace it.
- Listen for motor sounds when pressing the button (1 minute). No sound? Electrical problem—call a tech.
- Get underneath and visually inspect tracks (5 minutes). Dirty? Clean and lubricate.
- Test the slide again. Works? Problem solved.
- Still stuck? Follow the troubleshooting flowchart to narrow down the issue.
Most people solve their problem by Step 4. If you’ve reached Step 6, you likely need professional help—but you’ve eliminated DIY possibilities and can explain the problem clearly to a technician.
For prevention:
- Lubricate every 3–4 months.
- Never extend slides on unlevel ground.
- Never drive with slides extended.
- Inspect visually once a month.
These four simple habits prevent 90% of slide-out issues before they happen.
Your RV is a significant investment. A $40 can of slide lubricant and 15 minutes of maintenance every few months is infinitely cheaper and easier than a $2,000 emergency repair during your vacation.
Now get out there, keep those slides gliding smoothly, and enjoy your RV adventures without worrying about whether you’ll be able to retract your living room.
Additional Resources and Expert Links
For RV-specific slide maintenance products, the Good Sam Foundation’s RV Maintenance Guide provides approved products and best practices for RV owners.
For manufacturer-specific slide systems, consult the Recreational Vehicle Industry Association (RVIA) for resources on different slide-out manufacturers and proper maintenance.