When you’re living the RV lifestyle, power independence is everything. But here’s the problem most RVers face: without proper monitoring, you’re essentially flying blind with your solar system. You might think your batteries are full when they’re actually dangerously low, or you could be wasting valuable solar production without even knowing it. This is where RV solar monitoring comes in—transforming you from a passive power consumer into an active energy manager.
Whether you’re planning an off-grid caravan solar system adventure across Australia or upgrading your current setup, understanding how to monitor your RV solar system output is crucial. From remote Australian outback travel to weekend camping trips, having real-time visibility into your caravan’s power generation and consumption makes the difference between freedom and frustration.
Why RV Solar Monitoring is Essential for RV Owners
Think about your car’s fuel gauge. You wouldn’t drive across the country without checking it regularly, right? Your RV battery system needs the same attention. Accurate monitoring transforms you from a passive power consumer into an active energy manager. When you know exactly how much power is flowing in and out of your batteries, you can make informed decisions.
Without monitoring, you’ll face several challenges:
- Battery damage from over-discharge – Lithium and lead-acid batteries suffer permanent damage when drained too far
- Reduced battery lifespan – Poor charging practices can cut your battery bank’s life in half
- Unexpected power loss – Imagine losing power mid-trip with no warning
- Wasted solar investment – You won’t know if panels are underperforming due to dirt, shading, or failure
Also Read:- RV Solar Panel Angle: Does It Really Matter? The Complete Guide to RV Solar Power Optimization
Why Solar Monitoring is Essential for Off-Grid Caravans
For Australians exploring remote regions or those planning an off-grid caravan solar system adventure, monitoring becomes even more critical. Unlike stationary homes with grid backup, your caravan’s solar system is your lifeline in the outback. With limited electrical infrastructure across Australia’s vast interior, setting up monitoring devices or apps to track real-time energy production, battery health, and system performance isn’t optional—it’s essential.
A typical Australian caravan needs 200 to 400 watts of solar panels to provide essential energy requirements for lighting, electronics, and small appliances, but only proper monitoring lets you know if your system is actually delivering. When you’re parked 200km from the nearest town, there’s no room for surprises about your power reserves.
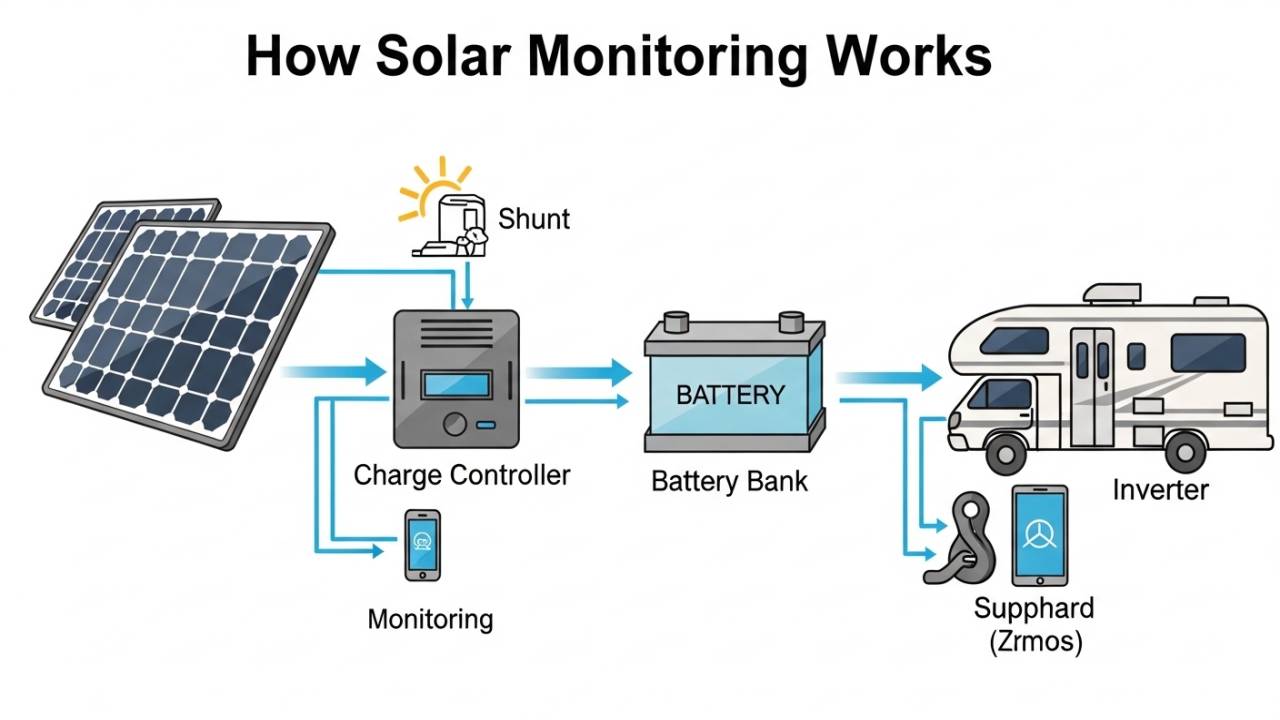
Types of RV Solar Monitors Explained
RV solar monitors come in different categories, each serving unique purposes in your power system.
Battery Monitors vs. System Monitors: What’s the Difference?
Battery Monitors focus exclusively on your battery bank’s health and status. They measure what’s flowing in and out of your batteries using a component called a shunt. A smart shunt includes onboard electronics that communicate data to your battery monitor or app. That’s the kind you want for an RV solar system—because it tells you, in real time, exactly what’s going on with your batteries.
Battery monitors answer critical questions:
- What’s my current state of charge (SOC) percentage?
- How many amps am I drawing right now?
- How much power is coming in from solar or chargers?
- How long until my batteries are completely drained?
System Monitors take a broader view, tracking multiple components of your entire solar power system. These monitor solar panels, charge controllers, batteries, and loads all in one integrated display. System monitors are ideal if you want complete energy visibility across your entire RV power ecosystem.
Also Read:- RV Solar in Santa Fe: Get Free Power From the Desert Sun
Inverter-Integrated Monitoring
Many modern inverters include built-in monitoring features through LCD displays or web portals. While convenient, these are limited compared to dedicated battery monitors because they don’t track raw current flow to your batteries.
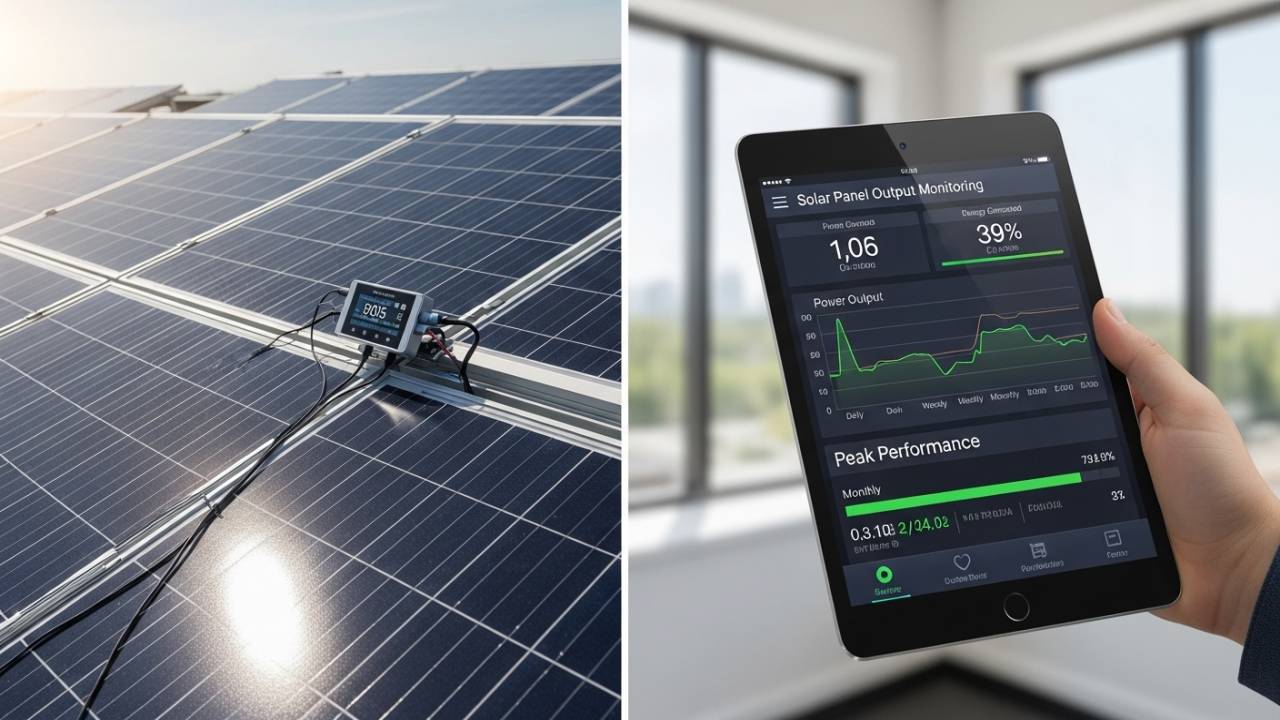
App-Based Monitoring Options
The evolution of solar technology has brought wireless monitoring to RVs. Many solar panel manufacturers and third-party providers offer online monitoring platforms that provide comprehensive performance tracking with user interfaces typically featuring dashboards displaying key metrics like energy production, consumption, and savings.
Popular app-based solutions include:
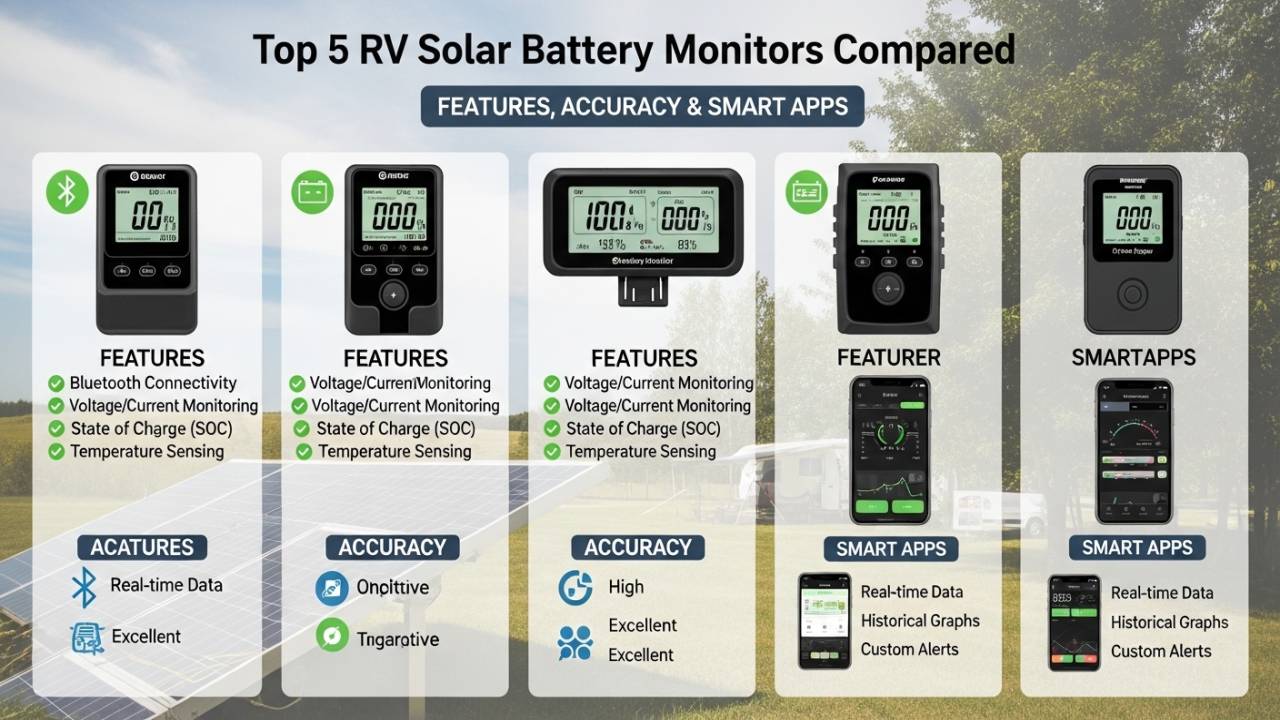
Victron Connect – Offers real-time data, historical trends, and alarms via Bluetooth. Works seamlessly with Victron battery monitors and is the go-to choice for serious off-grid enthusiasts across Australia.
Renogy App – Provides straightforward monitoring with basic alerts and intuitive interface designed for RV users.
SIMARINE PICO – High-end touchscreen system with integrated tank monitoring alongside battery data.
Sungrow Solar Monitoring App (iSolarCloud) – The most popular choice for home and caravan solar systems in Australia, offering the iSolarCloud monitoring platform available for both mobile devices and home computers. If you have a best caravan solar panel kit from Sungrow or are monitoring solar panel output for your caravan, this Australian-focused app is invaluable. Sungrow is the most popular solar inverter sold in Australia in 2023, and their iSolarCloud app provides good basic solar monitoring with the ability to maximize energy savings by understanding consumption patterns.
Home Solar Monitoring Systems – Vehicle management systems let you monitor your caravan’s power usage in real-time, tracking battery levels, energy consumption, and power input from solar panels, giving you full control over your off-grid power setup. This is particularly valuable for those with the best solar monitoring systems in Australia.
Manufacturer-specific apps – Integrated with charge controllers and inverters from various brands.
Top 5 RV Solar Battery Monitors Compared: Features, Accuracy & Smart Apps
Key Performance Metrics You Need to Track
To properly monitor your RV solar output, especially if you’re planning an off-grid caravan solar system adventure across Australia, focus on these essential measurements:
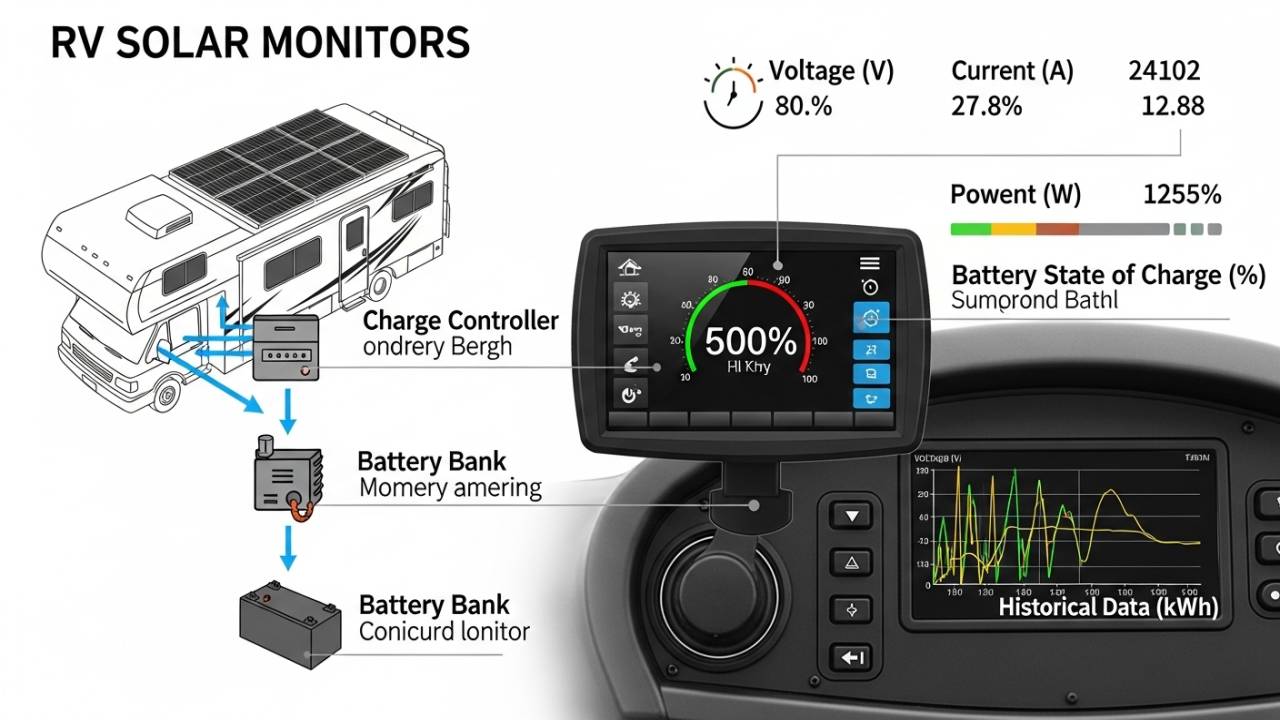
State of Charge (SOC) – Displayed as a percentage (0-100%), this is the single most important number. It tells you exactly how much usable battery capacity remains, not just voltage. In Australia’s variable climate, knowing your exact SOC helps you predict how long you can run with cloud cover.
Current Flow (Amps) – Shows what’s being drawn from batteries or charging into them. Sudden spikes indicate high-load appliances activating. For caravan users, monitoring amps helps you understand which appliances consume the most power (air conditioning, water heaters, inverters).
Power (Watts) – Combines voltage and amperage to show actual power consumption. Your 2000W microwave will show exactly 2000W when running. This is crucial for managing loads in off-grid caravan solar systems.
Amp-Hours Consumed – Tracks total energy used since last full charge. Essential for planning your daily power budget, especially when boondocking in remote Australian locations.
Time Remaining – This gives you an estimate of time remaining on the battery, which is useful when you’re running loads that draw more or less a constant amount of power, such as lights or chargers.
Temperature – Battery performance changes with temperature. Some advanced monitors track this. Australian summer heat can reduce battery efficiency, so temperature monitoring is valuable.
Solar Panel Output – Monitor your actual solar production to ensure panels are clean and performing optimally, especially important in dusty Australian outback regions.
Also Read:- Santa Fe RV Solar High Desert Performance & Maintenance Guide
Battery Monitor vs. System Monitor: Which Should You Choose?
Choose a Battery Monitor if:
- You already have a quality solar charge controller with good readouts
- You want accurate battery bank data without extra complexity
- Budget is a primary concern
- Your main goal is preventing over-discharge
Choose a System Monitor if:
- You want complete visibility of solar production, charging, and consumption
- You’re troubleshooting performance issues across multiple components
- You want to track historical data and trends
- You’re running a complex setup with multiple power sources
DIY Battery Monitor Installation: Step-by-Step Guide
Installing a battery monitor yourself is achievable and can save $200-300 in labor costs. Here’s how to do it properly. This is especially relevant for Australian RV enthusiasts building their own off-grid caravan solar systems.
Tools and Materials Needed
- Battery monitor kit (includes shunt and display)
- Wire cutters and strippers
- Battery cable or marine-grade wire
- Heat shrink tubing
- Wire crimpers and ring terminals
- Multimeter for testing
- Gloves and safety glasses (important for working with high-current systems)
Installation Steps
Step 1: Disconnect Power Turn off all loads and disconnect the negative terminal from your battery. This prevents accidental shorts while working. This is critical safety when installing any part of your best caravan solar panel kit or monitoring system.
Step 2: Identify Installation Location Mount the shunt as close as possible to your battery’s negative terminal. This provides the most accurate readings. The display can be mounted anywhere convenient inside your RV. In Australian caravans, many RVers mount displays in the main living area for easy visibility.
Step 3: Connect the Shunt The shunt has four terminals:
- B-: Connects directly to battery negative
- P-: Connects to your system’s negative bus bar
- S-: Sensor connection to display (usually pre-connected)
- +: Connects to battery positive
Cut your existing negative battery cable and insert the shunt. The B- terminal connects to the battery, and P- connects to your original cable leading to the rest of your system.
Step 4: Route Display Wires Run the sensor cables from the shunt to your display location. Keep them away from high-current cables to minimize electrical noise. This is especially important in compact caravan installations.
Step 5: Make Electrical Connections Use marine-grade wire and solder connections for reliability. Heat shrink all exposed connections. Test with your multimeter before proceeding.
Step 6: Test and Calibrate Power on the system. Most monitors require initial setup:
- Set your battery capacity in amp-hours
- Calibrate to 100% by connecting to shore power or running your solar system to full charge
- Program your battery chemistry (lithium vs. lead-acid). This is critical—modern off-grid caravan solar systems often use LiFePO₄ batteries
- Test alarms at programmed thresholds
Step 7: Regular Maintenance A good rule of thumb is to plug into shore power and reset your state of charge every 3 months. This prevents your monitor from showing inaccurate readings. In remote Australian locations, this might mean syncing during periodic town visits.
Also Read:- RV Solar Installation in Albuquerque: Your Complete Guide to Top Shops + DIY Setup
Monitoring Your Solar Panel Output: Ensuring Peak Performance
For those with the best caravan solar panel kit, monitoring solar panel output is as important as battery monitoring. Your panels are only useful if they’re actually producing power. Track these indicators:
- Daily production trends – Compare today’s output to yesterday. Sudden drops indicate panel issues
- Production vs. weather – On sunny days, production should be predictable. If it’s not, check for dirt, pollen, or bird droppings on panels
- Time-of-day production – Note when production peaks (usually 10am-3pm Australian time)
- Seasonal variations – Australian summer gives longer production hours; winter reduces output significantly
For off-grid caravan solar system users, understanding these patterns helps you plan rest days and movement between locations based on predicted solar generation.
Common RV Solar Monitoring Questions
Q: Can I use a simple voltmeter instead of a battery monitor?
A: No. Voltage readings are highly unreliable for determining actual battery capacity. Without an accurate monitor, you could go from what appears to be a full charge to a sudden power cutoff with very little warning. A voltmeter might show 13V when your battery is actually 50% discharged.
Q: How accurate are app-based monitors versus display monitors?
A: Both provide the same accuracy if measuring the same shunt. The difference is access method—display monitors give instant local access while app monitors require Bluetooth range or WiFi connectivity. For critical decisions in remote areas, keep both options available. This is especially important for off-grid caravan solar system users who may lose internet connectivity in remote Australian locations.
Q: Do I need a separate solar monitor or does my charge controller have enough data?
A: Most charge controllers only monitor charging current, not total system loads. A dedicated monitor shows the complete picture: solar in, loads out, and current battery status. For comprehensive off-grid caravan solar system monitoring, a dedicated monitor is essential. If you’re using a best caravan solar panel kit, it likely includes monitoring—verify what data is actually accessible to you.
Q: What voltage range should my RV solar monitor support?
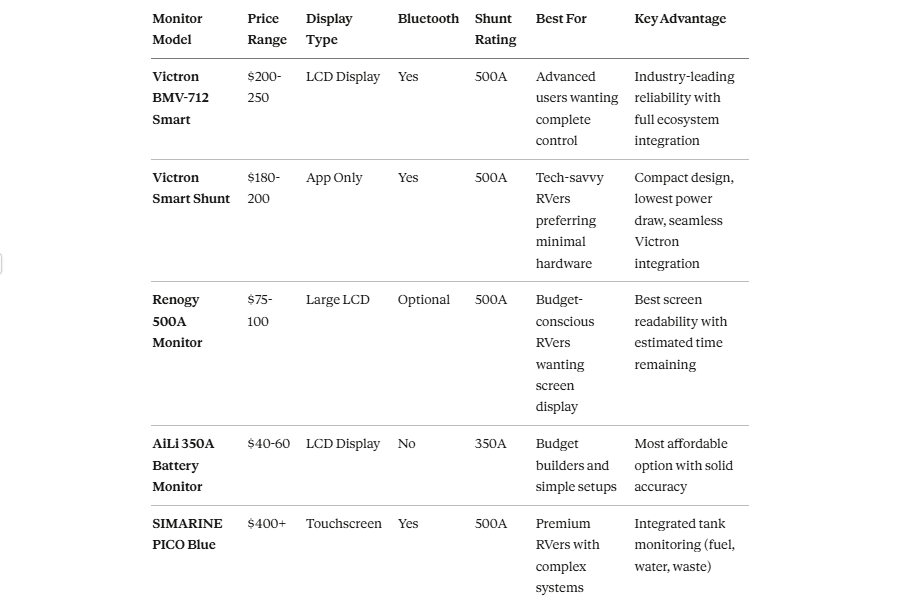
A: Match it to your system: 12V systems need 10-120V range, 24V systems need 20-120V range, and 48V systems need 40-100V minimum. The Renogy 500A Battery Monitor provides 1% accuracy in voltage and current readings up to 500A with a clear, backlit display and supports multiple battery types including Lead Acid, Lithium Iron Phosphate, and Lithium-ion.
Q: How do I set up the Sungrow solar monitoring app for my caravan system in Australia?
A: Once your solar monitoring system is installed and powered up, download the iSolarCloud app. Create an account and ensure your inverter is connected to WiFi. In your device settings, select the Sungrow WiFi network labeled ‘SG-XXXXXXXXX’ and enter your home network credentials. The iSolarCloud app will then provide real-time monitoring of your solar production, consumption, and savings. This Australian-focused platform is especially useful for understanding how your caravan solar panel output performs throughout the day, allowing you to optimize energy usage and maximize your off-grid capability.
Choosing Your RV Solar Monitoring Solution
The right monitor depends on your priorities, budget, and system complexity.
Best Caravan Solar Panel Kits in Australia
When selecting a best caravan solar panel kit, look for packages that include:
- Quality high-efficiency solar panels (typically 100-400W for caravans)
- Integrated charge controller with monitoring
- Battery monitoring capability (essential for off-grid work)
- Wiring and installation components
- Mobile app support for real-time tracking
Popular Australian brands offering complete off-grid caravan solar system kits include Victron-based packages from Zero Grid, Arizon Off-Grid solar panels with Victron monitoring, and integrated systems from local installers who understand Australian outback conditions.
Also Read:- How to Charge RV Battery with Solar: Best Solar Chargers, Panels & RV Solar Power Systems
Monitor Selection by User Type
For Budget-Conscious RVers: Start with the AiLi 350A monitor ($40-60 AUD). It provides accurate core data without Bluetooth or display sophistication. Upgrade later as your system grows.
For Most RVers: The Renogy 500A ($75-100 AUD) or Victron SmartShunt ($180-200 AUD) offer excellent value. The Renogy excels with its display; the Victron wins with integration and app quality.
For Power-System Enthusiasts: Invest in the Victron BMV-712 ($200-250 AUD) for complete control, or the SIMARINE PICO ($400+ AUD) for integrated tank monitoring alongside battery data.
For Australian Off-Grid Caravan Users: Prioritize systems with robust mobile app support since you may lose WiFi connectivity. Victron’s Bluetooth capability or Sungrow’s iSolarCloud platform with 4G dongle options work well in remote Australia. Ensure your monitor supports Lithium batteries if you’re using modern LiFePO₄ systems.
For Expansion-Minded RVers: Choose a Victron solution. Their products integrate seamlessly, allowing future additions of inverter chargers, MPPT controllers, and remote monitoring systems.
Final Thoughts on RV Solar Monitoring
Your solar investment represents thousands of dollars and months or years of RV freedom. Monitoring that system is insurance. A quality battery bank is a significant investment. Proper monitoring is the best way to protect it.
Start simple if you’re new to solar. You can always add complexity later. The important thing is knowing—right now, today—exactly how much power you have, how much you’re using, and when you need to dial back consumption or seek sun to recharge.
Whether you choose Bluetooth connectivity, a dedicated display, or simple wall-mounted gauges, get monitoring in place before your first boondocking trip. Your batteries—and your peace of mind—will thank you.
Still deciding on your RV solar setup? Start with monitoring in mind from day one. It’s the single best investment for understanding and managing your mobile power independence.